As I’ve already written about, I recently moved my site from WordPress to being statically generated using Hugo. As part of that change, I also moved off of my current hosting provider and starting running my site directly from Microsoft Azure. All of the content for the site (HTML, CSS, JavaScript and images) is generated and then pushed into Azure blob storage to be used as part of an Azure static website. When you setup a static website, you get a URL that you can use to directly hit your content, but to provide better performance (especially across many locations) I decided to put a CDN in front of the direct website URL.
Azure supports a variety of CDNs and all of them would likely work for this scenario, but I went with the Verizon Premium offering as I liked the rules engine it provides. Without any code running on my server, many of the little tweaks that I want to do, such as:
redirecting http to https,
redirecting my root domain to the www version, and
handling some URL changes between the new site and my old WordPress instance
would be very difficult to accomplish. Custom rules at the CDN layer can take care of all of these common needs without too much trouble.
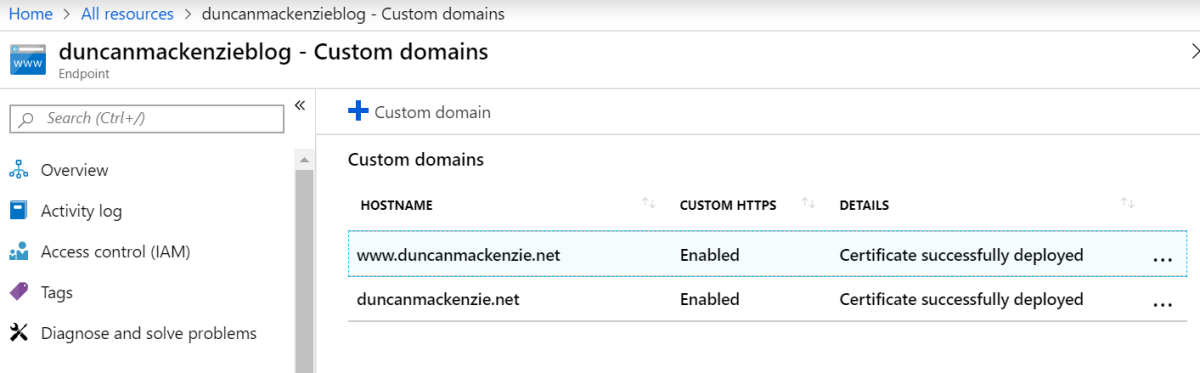
With that done, duncanmackenzie.net and www.duncanmackenzie.net both pointed at my CDN profile, and then I could let the CDN know that it should accept requests with those hosts by adding them to the CDN endpoint’s ‘custom domains’ configuration.
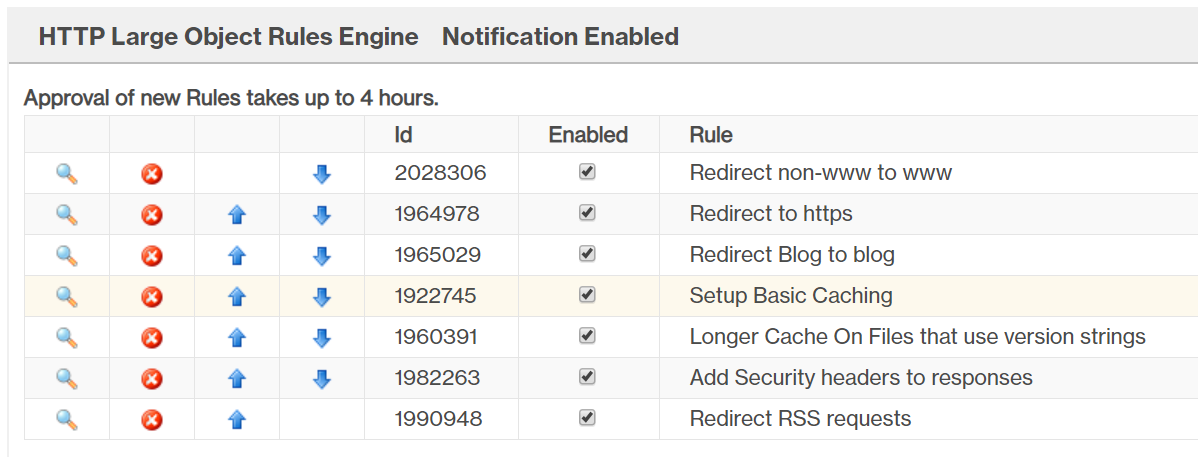
Time to setup my custom rules to handle all of those issues, and take care of a few other goals before I will be ready to go live. With the Premium Verizon CDN I’m using, rules management is done in an external portal. From your CDN profile overview page in the Azure portal, click on ‘Manage’ to launch this management site. From the menu, select HTTP Large > Rules Engine to bring up the list of active rules. This should be empty to start with, but I have set up various rules that I will walk you through one at a time. I’ll go through the specific rules I’m using, but more details on the overall rules engine for the Azure Premium Verizon CDN are available in the documentation.
We want everyone to access our site at a single canonical location, and for me that location will be https://www.duncanmackenzie.net. When someone types the domain name into the browser, I can’t guarantee that they won’t try to go to http:// instead of https:// so that is the first issue I want to handle.
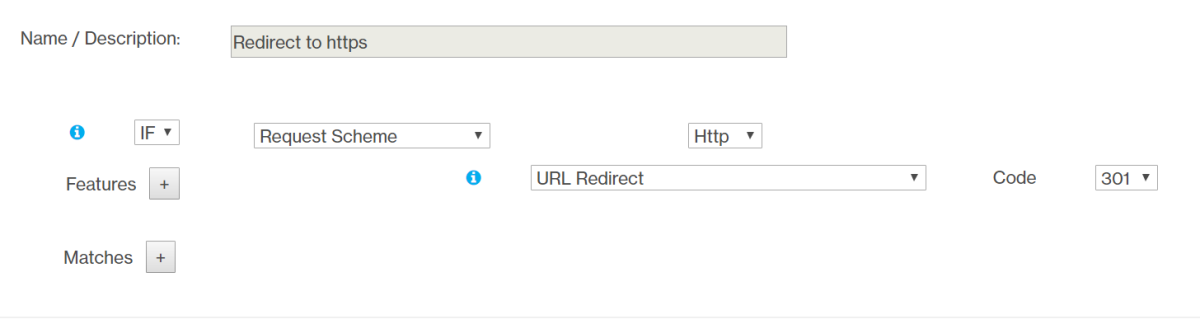
Explaining the rule using an image isn’t great, one because it is a very wide image and hard to fit everything into one screenshot, but also because it wouldn’t be very accessible. Instead, I’ll walk through the rule written as pseudo-code.
Rules start with a IF clause that determines when the rule should be applied. Alternatively, you can pick IF Always, and that means the rule will apply to all requests with no conditions.
For this rule, we are checking if the Request Scheme is equal to http, so it will apply to any request using that scheme, and will not apply if a request comes in already using https. The rule itself will take one or more actions, that you add as ‘Features’. In this case, we are doing a URL Redirect (returning status code 301), and it lets us apply a Regex to the incoming requests as another layer of control over when this code runs. In this case, I’ve used a regex of (.*) that will match everything and put it all into a ‘capturing group’ that we then use in the Destination by putting $1. The Destination is put in as https://www.duncanmackenzie.net/$1, which means that whatever path the incoming request has will be added to the new URL as well. Instead of putting www.duncanmackenzie.net into the rule, I could have used a variable https://%{host}/$1. This would have meant that a request for http://duncanmackenzie.net/foo would have gone to https://duncanmackenzie.net/foo and a request for http://www.duncanmackenzie.net/foo would go to https://www.duncanmackenzie.net/foo. In this case though, I already know I’m planning a 2nd rule that takes all non-www requests and redirects to www, so why not skip a step in the case of http requests and send them right to the proper place?
This is a choice, you could go the other way and redirect www to the bare domain. Either works, but you should do this rule regardless; you want everyone to end up on the same domain instead of a mix of two. So, in this case, the conditional for the rule is “IF Edge CName == duncanmackenzie.net” and the action is then to do a redirect, with a pattern of (.*) and a destination of https://www.duncanmackenzie.net/$1. Once again, although the incoming requests could be http or https, we might as well force them all to https at this time since that is our ultimate goal.
To add this using the CDN rules, I create a new rule with a match condition of Always, so that it applies to every single request. Then I use the ‘Modify Client Response-Header’ feature to append the Strict-Transport-Security header with a value of max-age=31536000; includeSubDomains. This will tell browsers that anyone hitting duncanmackenzie.net or any sub-domain to use HTTPS even if the user followed a link that used http or even if they directly typed in http://.
The benefit of the CDN is that it will cache my content (HTML, CSS, JavaScript, images, etc.) on it’s servers and use that cache to quickly respond to requests instead of having to go all the way back to my blob storage account. For that to work, we need to tell the CDN two things:
How long to hang on to whatever content it caches
How long to tell the user’s browser to hang on to content
In both cases, you are making a tradeoff between performance and time to update when you make a change. If you set the cache time on your HTML content to a year, any change to that content may not be visible to the users for up to a year. That’s probably not a good thing in terms of your HTML pages, but for assets like CSS and JavaScript that are shared across your pages, it would be great. Unfortunately, the same issue exists, if you have a URL like /assets/main.css as part of your site and you set it’s cache time to a year then any update to that CSS may not appear to the users for up to that amount of time.
The solution to this is to use versioned file names, names that change everytime you change the content. Many Hugo themes, including the one I am using take advantage of Hugo’s pipes feature to accomplish exactly this. A unique filename is created for the CSS and JavaScript files whenever they change. This markup in the theme
Now I can happily cache the content of these files for as long as I want. When I update them, the URL will change, and the CDN will cache the new content and everything will be great. I can’t do the same for my images or my HTML though, as both of those are using nice normal URLs like /blog/<post name>/ and I need them to update relatively quickly. To get the right result, I’m creating two different rules, and setting 10 minutes as the cache expiry for my versioned content and 2 weeks as the expiry for everything else.
To setup the first rule, I use the IF Always condition, to apply it to every request and then use I include two ‘features’. First I set the Default Internal Max-Age, which determines how long the CDN itself should hang on to the content from the origin server (my static website), to 10 minutes. Next, I set the External Max-Age to 600 seconds (which is also ten minutes, but I like to use the same unit that the real header uses). So, by default now, it will take up to 10 minutes from when I update a file until I can guarantee that users will be seeing that new content.
For the versioned files, I add a second rule, and put it in the rule list below the first.
Rules are applied in order, so when I set the External Max-Age header in this second rule, it will override the first one.
In the second rule, I use the conditional of URL Path Extension Matches css js png jpg ico webmanifest, which will hit my nice versioned CSS and JS files, but I’ve also decided that I don’t really update images, and if I do, I can update their filename and change the image reference in my content so I’m going to cache them for longer as well. Then, just as above I add in two features to set the internal and external cache expiry, but in this case I set the values to 2 weeks. You could go longer here, and in fact, many web performance guides will recommend a value more like a year, but the point is to configure this value separately and longer than your regular HTML content.
Adding a special rule to redirect from /Blog to /blog #
When I setup my new Hugo blog, I ended up with all lower-case URLs, like /blog/new-blog-performance/, but my WordPress site had /Blog in the path. On the web, URLs are case-sensitive, so this means that all of my old posts are still linked out there using that capital letter B. Once I launch my new site and switch the DNS over to hit it, all of those links will 404. This is actually a large problem, because some of my URLs had mixed case titles as well, but in most cases just fixing the /Blog to /blog issue would resolve the broken link so that is what I’m going to start with. At the CDN layer, I can make a rule that matches any incoming link with /Blog and redirects that to the same path but using /blog.
I could have, alternatively, done a URL Rewrite, which would change the URL that is sent back to my static site. This wouldn’t change the URL the user ends up at, it would just seem like both /Blog and /blog work. I would rather get people to the right URL though, so that any future person sharing it out or linking to it is more likely to use the correct one.
So, I started with a conditional of IF URL Path Directory Matches */Blog/* making sure Ignore Case was not selected and picking ‘Relative To: Origin’. Then, using the ‘URL Redirect’ feature again, I made the source Blog\/(.*) and the destination https://www.duncanmackenzie.net/blog/$1. This hasn’t completely fixed my issue, as some of my blog posts had mixed case in other parts of the URL, but it took care of the bulk of them.
I have a great deal more info to share about setting up this simple site, but hopefully this introduction into using custom rules with your Azure CDN will help a few folks. For these common tasks, like redirecting http to https, a custom rule is a great solution.